Click on the Staff Icon on your User ToolBar, followed by Leave.

Then click on New.

| 19) | Leave - Appllication Form |
|
The Leave Application Form is kept in its simplest form. Depending on your company, certain Leave Types discussed here may be slightly different from yours. |
|
To access the Leave Application Form: |
| i) |
Click on the Staff Icon on your User ToolBar, followed by Leave. |

|
| ii) |
Then click on New. |

|

|
| i) | Selecting Dates | |
|
Start off by specifying the Date(s) of leave to be taken. Click on the drop-down lists for day, month and year. Alternative, you may click on the *From or *To links to pop up a reference calendar. |

|
|
| ii) | Leave Type | |
|
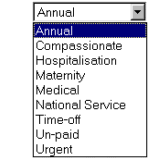
Next select the appropriate Leave Type e.g. Annual, Medical, National Service, Time-off, etc. The defination of Leave types is pre-assigned by HR Manager. |

|
|
| iii) | Full / Half Day | |
|
If it is a Half-Day application, make sure that the proper option is selected from the drop-down list. The Reason field is optional. It will be courteous to let your boss know roughly the reason for your leave application. |

|
|
| iv) | Advanced Options | |
|
Click on the More... button for advanced options. |

|
|
For instance, you would like to submit various dates (eg 28-Feb, 3-Mar, 5-Mar and 8-Mar) in one application, start off by selecting the first and last date in the basic leave form. Once the Leave Type and Reason have been specified, click on the More... button to further select date options within the earlier specified date range. You may also have a mixture of Full Day and Half-Day leaves in the advanced option. For more details, please refer to the user guide in the Advanced Options page. |
|
| v) | Application Process |
|
Upon submission, your leave application record will be stored in the Leave database. A Notification StickyNotes will be automatically sent to the pre-assigned Approving Officer. The Chain of Approval may be very simple or complicated, depending on the rules set by the Office Management Upon approval, a Notification Message will be sent to you via StickyNotes. The leave calculation will be done automatically, deducting the number of days applied from your leave balance records. |
| Leave - Manager | Contents | Leave - Advanced Options |